Sloping Off - December 2004
Coke Can Scale
 I heard from Patrick Leray, a Sopwith Bee-builder from Louisiana the other day. Apart from bending a wing-tip on a cross-wind take-off and then coming second in a Texaco 1/2A comp to his student, his time has been spent in developing new techniques, as he will tell you in his inimitable way:
OK, I have a NEW TECHNIQUE for you! Consider for a moment, metal panels on scale aircraft. Traditionally they're done with either litho plate or one of the commercially available (expensive) metal surfacing systems. I've developed a DIRT CHEAP (typical for me) method, which gives a really quite good rendition of riveted aluminum. Ready?
Consider now the humble Diet Coke can. Or, I imagine, any of the Coke products in aluminum cans. To cut off the top, take a sharp and pointed knife and pierce into the can below the rim on top. Then, without bending or denting the can (support it with your palm), plunge the blade in a few more times, making a slit parallel to the top. Now insert a pair of thin-bladed, sharp scissors (Fiskars-type work well) and with small nips, cut the top off. Careful of the edges, cut lengthwise down the can to just above the base and, again with small nips, cut off the base of the can. Drag the piece of metal (inside surface up) over and down the edge of a tabletop to uncurl the metal. This may take a few pulls.
The inside surface has a fine criss-cross pattern brushed into the aluminum which is not bad looking as is. It is also coated with a clear plastic-like coating of some sort, giving it a high gloss. Still, it's not really suitable for our purposes. So here are two options.
Get rid of the coating by sanding with 120-150 grit wet-or-dry sandpaper used wet. Now, the first option involves keeping the strokes of your hand going back and forth in one direction on the surface. This must be done on a CLEAN and hard surface, because any imperfections will be embossed into the metal and will be impossible to remove. When the coating is removed (finally!) from most of the sheet, switch to 600 grit wet-or-dry, used wet at first, then after awhile, use it dry. This yields a "brushed aluminum" surface treatment, moderately bright and lustrous. As an added benefit, the sanding has removed a noticeable amount of the already thin metal stock, and it now weighs hardly anything!
 Option two is even more suitable for our use on models. As one is removing the clear coating, apply the wet 120-150 sandpaper in small circular movements, as if one's fingers were a tiny buffing pad. Then do the same with the 600 grit paper (wet first, then dry). The fine, random swirls will fade and blend together under the dry 600 and give a surface VERY like the plain garden-variety aluminum finish on full-size aircraft. Again, do all this on a clean, flat, smooth, hard surface.
Now, the BEST PART. Rivets! Flip the piece over to the printed side and LIGHTLY draw a line with a fiber-tip or gel pen, whatever kind one can find that will mark the surface. Go through all your old semi-working ballpoint pens until you find one with a FINE point. As in sharply pointed. Not rounded at all. If need be, go buy one.
Place the metal, printed and line-marked side up, onto TWO layers of kitchen-type paper towels. Four layers are too soft, and one layer is not resilient enough for what happens next. Lay a ruler alongside your line with the inches or mm scale close to it. Press the point of the pen VERTICALLY onto the aluminum with firm pressure, indenting the metal (but not enough to puncture it!). Move to the next increment mark (1/8" is a good starting size) and repeat, etc, etc. This is where the two layers of paper towel are important. I've tried numerous variations, and this works best. Now for the finale.
After eight or ten indentations, stop and turn the plate over. The "tiny peaks" are somewhat crude in appearance, and the surrounding metal has been deformed slightly, giving an only marginally acceptable impression of rivets. But now....
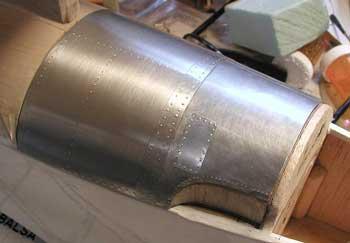
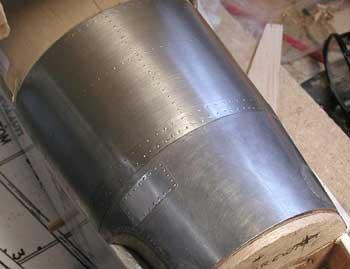
 Go back to that smooth, hard, flat surface and place the metal shiny side UP. Get a 1/8" drill bit from your tools, and make sure the BUTT end is smooth and slightly rounded. (Rub it on the 120 grit sandpaper if it's not smooth.) Now go to the "peaks", and pressing down VERTICALLY, squash each of them with moderately firm pressure directly on its little point. They will almost disappear, but not quite. Do all of them, then lean back and take a look. The impression of small, almost flush rivets is quite good!
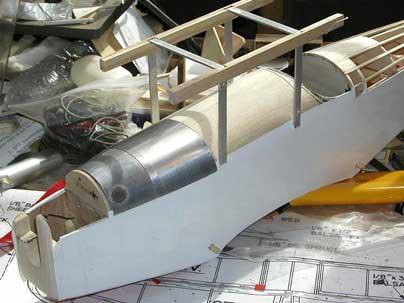
When one has made a panel for whatever application, cowling, access door, hood, etc, the metal is attached to the structure with a thin layer of slightly thinned or warmed epoxy. Experimentation with the material, and with polishing techniques, will yield even more variations on this. Try buffing it lightly with the dry 600 grit after the rivets are formed. It's so light that even small electrics could benefit from it!
I've attached a few photos of a Currie Wot on which I'm working, where I developed this. Its appearance is so realistic, my flying buddy had to keep me from covering the entire front of the plane in metal panels! (And I may yet!) Now I'm working on a method of getting hex-head nut replicas onto the aluminum! (He means "aluminium: MR)
Many thanks to Patrick for letting me share this technique with you. Ed