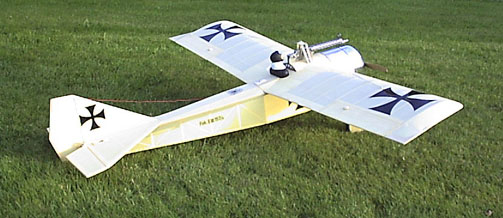
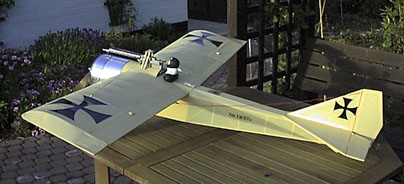
An Electric Conversion of the Flair Magnatilla by Neil Longman
The Project
Well it's that time again for your Activities Sec. to convert
another smelly kit to sparky power. This time around I have chosen
a tried and trusted kit from the Flair Scout Series, namely the
Magnatilla. If you are not already familiar with this kit, it
is loosely based around the WW1 German Eindecker.
What's in the Box?
The Magnatilla has been upgraded over the years and now features
a CNC cut Liteply & balsa front section for the fuz with a
built-up wing also now with CNC cut Liteply and Balsa. The rear
of the fuz and the tail feathers are unchanged, using the same
open structure of stick balsa. Standard hardware is included with
the kit, with the exception of wheels (which are sold separately).
Also a Vinyl Maltese Cross decal set was included, which I will
discuss later!
What's not in the Box?
Well, as mentioned above, the WW1 style wheels are not included.
These are quite pricey and very heavy - not ideal for a sparky
conversion, but I am glad I used them in the end. Other items
can be purchased for the Magnatilla as well as the other kits
in the Flair Scout Series. These are machine guns, pilots, bullets,
dummy engines, and closed loop rudder and elevator systems, complete
with compensators. I added all these items to my model for that
extra detailed look.
Building
The more modern format to the kit makes the Magnatilla a very
easy build indeed. The wing is self-jigging and can be built very
swiftly, the CNC front section of the fuz also. The rear section
of the fuz is built and pinned over the plan in the traditional
way. A word of warning here is that this part of the fuz is too
wide to marry up with the front section of the fuz, so some filling
and adjusting will need to be done when the two fuz sections are
joined. This is an error in the plan and Magnatillas have always
had this flaw. The tail feathers are built in the same way as
the rear section of the fuz.
 Modifications for
Sparky Power
Modifications for
Sparky Power
Very few, really. The only changes made to the model were a false
floor for the flight packs and changes made to the firewall for
sparky power.
Smelly Weight & Power to Sparky Weight & Power
The Magnatilla is designed to fly on .40 size two strokes, or
.50 size four strokes and should come in around the 5 to 5.5 pound
weight range. Some quick calculations using our tried and trusted
two cells per pound and one for the pot, gives us a model which
should perform well on somewhere between 12-14 cells and should
weigh around 7 to 7.5 pounds. Power train would need to be around
the 700 size motors. Micro radio gear to be fitted using the normal
15 gram size servos should shave around 7 ounces from the AUW.
Motor and Cell Choices
Originally I was going to use a Plettenberg 290-30-13, direct
drive throwing a 12 or 13-inch prop, but unfortunately due to
delays, (no fault of Gordon Tarling's I might add) I had to plump
for a slightly less powerful and ultimately heavier and more problematic
power train. A Graupner speed 700 Neodym motor was chosen. This
is an excellent motor for the money, but is useless without a
gearbox. I had a Robbe planetary box handy which has a 3.7:1 ratio,
so after much playing with Motocalc, 14 cells and a 14x10 Zinger
prop were selected.
Wiggly Bits
Four SD 200 15 gram servos, one Kontronic Sun speed controller,
one GWS 8 channel receiver, all very lightweight and excellent
products.
Finishing
The model was finished in Antique Solartex, a superb covering
to work with, having a good shrink rate and does not wrinkle.
The vinyl Maltese crosses however are not so good - they just
won't stick down onto the curved surface of the wing. If anyone
has the answer to this problem I would love to know before John
and Lionel judge this model for its finish in the Autumn! The
dummy engines are easy to build, just like any other plastic kit
that we have all built over the years, and the same goes for the
machine gun. The pilot has to be joined and painted and of course
must be fitted with a flapping scarf! I also added some rigging
wires to the wing, made up from leftover close loop wire.
| Techy Bits Wingspan 60" AUW 7.5lbs Wing Area 720sq ins Wing Loading 22.4oz / sq. ft Graupner 700 Neodym Motor Robbe 3.7:1 Planetary Gear Box Zinger 14x10" Prop 14 Sub C Cells Kontronik Sun Speed Controller GWS 8 channel receiver |
Motocalc Predictions Stall Speed 21mph Max Speed Level Flight 34 mph Climb 734 ft per min Static current draw 26.9amps Output 302.4 Watts Prop RPM 5412 64.6 oz Thrust 14 Sub C Cells |
Flying
The Maggie was test flown at Kings Park in June and flew very
steadily and slowly - just how I wanted her. The first flight
was flown with no coupled rudder and the model certainly needed
some rudder in the turns to keep the tail up. On the second flight
I used coupled rudder (whoooops, don't tell Mr Morris, that's
me cheating again using those damn computer trannies again!) and
this improved her positioning in the turn. The flight times are
only around 3.5 minutes as I am currently only using Sub C 1700mah
packs, but this allows for a safe go round if required and a taxi
back. I will upgrade this model to 3000 MNiH cells later in the
year and this should give a good safe 5.5 minute flight. Unfortunately
on the second landing the bungee system on the undercarriage failed
and prevented any further flights. This was only a rubber band
system and was not up to the job - the same thing happened again
at the Winchester Fly In and also this time broke the prop, thus
ending the Maggie's flights there, too. I have since modified
this with 5mm shock cord from our local camping centre and this
is now proving to be very successful.