
I have always had a love of Sopwith aeroplanes, probably from boyhood through reading Biggles Books. He flew a Camel you know. Having already made a 48" 1-1/2 Sopwith strutter which, like all Sopwith aircraft, flies superbly, I had a hankering for a larger model of the Pup, about one sixth scale, which should give a wing span of around 60". At about this time we had a bring & buy sale at the club and I bought a secondhand Flair Puppeteer kit for the princely sum of £30. However, on perusing the plan I realised that it was far from the scale model that I had wanted.
 The nose was far too
long, the undercarriage too far forwards and the wings where the
wrong section and dihedral. The remainder was pretty well scale
so I decided to use the kit as the basis of my model and alter
the offending parts back to scale outline. Having redrawn the
plan, I had to throw many of the kit parts away including the
wing ribs, tips, undercarriage and some bulkheads. I drew in a
structure for the battery tubes and a Graupner 700 motor with
a 3:1 in line gearbox. I also added a rubber sprung undercarriage
and tailskid.
The nose was far too
long, the undercarriage too far forwards and the wings where the
wrong section and dihedral. The remainder was pretty well scale
so I decided to use the kit as the basis of my model and alter
the offending parts back to scale outline. Having redrawn the
plan, I had to throw many of the kit parts away including the
wing ribs, tips, undercarriage and some bulkheads. I drew in a
structure for the battery tubes and a Graupner 700 motor with
a 3:1 in line gearbox. I also added a rubber sprung undercarriage
and tailskid.
The model structure was built up over a long period of time but
was finally completed early this year. Bench tests were carried
out on the motor but these were somewhat disappointing, giving
a static thrust of only 77ozs, not nearly enough for a draggy
biplane of this size. After some head scratching I wondered if
a Graupner Ultra 1300 motor similar to the one in my Chimera would
do the trick. On recounting my tale of woe to Neil, our Social
Sec, he said that he just happened to have a Graupner 1300/9 motor
with a 2.4:1 gearbox lying around doing nothing which he would
part with in exchange for much gold! I had no option but to rob
my piggy bank and pay the outrageous price for said motor. The
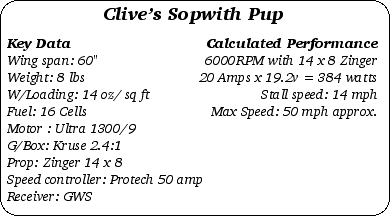
difference in performance is quite marked giving 114ozs of static
thrust using a 15" x 10" prop. On fitting this motor
to the model I found that the offset gearbox would not fit and
I had to modify the structure to suit. Finally the Pup was ready
for covering. I finished the front in Litho film, an aluminium
shim, the underside was covered in antique Fibafilm and the top
in WW1 Dark Green Fibafilm. Having whined pathetically to Trevor
about having no WW1 instruments, he kindly gave me an instrument
kit which included faces and bezels. These were painted and installed
together with the obligatory pilot. Finally the decals were fitted
and all that remained to be done was to fit the battery retainers
and rigging wires.
 I had a long wait
for a suitable windless day for the first flight. Finally one
appeared and I had run out of excuses not to fly, so I arranged
to meet Trevor and Jim at the Howard's flying site. I talked Trevor
into piloting for the first flight as he is far more experienced
with largish biplanes than I. After the normal first flight checks
had been carried out and with Jim wielding the camera, just in
case, Trevor flew her off in a very scale manner and immediately
requested full down trim as she was climbing like a homesick angel.
Having trimmed her out he carried out the usual flying checks,
power on and off stalls, left and right turns etc. Having landed
her and carried out some trim adjustments, we decided to reduce
the prop size from 15 x 10 to 13 x 10 as the extra thrust did
not seem to be required. The pup seems to do everything at the
same pace so full throttle did not translate into much more speed
or performance gain. I also noticed that the undercarriage torsion
bar was twisting under landing and took on the appearance of an
airbrake so this would need attention in the future.
I had a long wait
for a suitable windless day for the first flight. Finally one
appeared and I had run out of excuses not to fly, so I arranged
to meet Trevor and Jim at the Howard's flying site. I talked Trevor
into piloting for the first flight as he is far more experienced
with largish biplanes than I. After the normal first flight checks
had been carried out and with Jim wielding the camera, just in
case, Trevor flew her off in a very scale manner and immediately
requested full down trim as she was climbing like a homesick angel.
Having trimmed her out he carried out the usual flying checks,
power on and off stalls, left and right turns etc. Having landed
her and carried out some trim adjustments, we decided to reduce
the prop size from 15 x 10 to 13 x 10 as the extra thrust did
not seem to be required. The pup seems to do everything at the
same pace so full throttle did not translate into much more speed
or performance gain. I also noticed that the undercarriage torsion
bar was twisting under landing and took on the appearance of an
airbrake so this would need attention in the future.
 The next flight was
mine and I could not believe how easy to fly she was, with an
incredibly slow cruise and a practically non existent stall. She
was also quite sensitive to control inputs. On a dummy approach
she just floated past me at 20ft altitude and kept on going. On
the second attempt I managed a better approach and landing. The
13 x 10 prop was okay but looked too small for scale on this plane
so we settled on a 14 x 8. After this first outing I remade the
undercarriage so that it is now scale with a separate fixed spreader
bar and axle. The previous configuration did not work and served
me right for attempting to save weight in the wrong place. The
trims have been reset and the air holes to the motor enlarged
just as a precaution.
The next flight was
mine and I could not believe how easy to fly she was, with an
incredibly slow cruise and a practically non existent stall. She
was also quite sensitive to control inputs. On a dummy approach
she just floated past me at 20ft altitude and kept on going. On
the second attempt I managed a better approach and landing. The
13 x 10 prop was okay but looked too small for scale on this plane
so we settled on a 14 x 8. After this first outing I remade the
undercarriage so that it is now scale with a separate fixed spreader
bar and axle. The previous configuration did not work and served
me right for attempting to save weight in the wrong place. The
trims have been reset and the air holes to the motor enlarged
just as a precaution.
Now where is that Fokker Eindekker of Neil's? in the sun I expect, just waiting an opportunity to pounce.