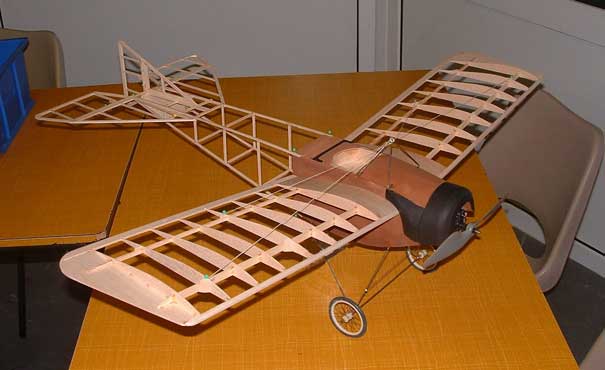
The 'Rapid Monoplane' is from a free plan in Radio Control Model World, Oct 2003. I thought that I could take a step back and model something slower and calmer to fly, something that anyone new to the club and to plan/scratch building might like to try after they decide, 'I like this radio control thing, I'll have some more....', but are not sure where to go next. Okay, there's a shed load of foamies and more traditional built-up kits which can be purchased, but maybe you have already bought the mag looking to gain an insight to this hobby of ours and can now look at the plan and say, 'That looks reasonable. I can try it at least.' And even if, as a first-timer trying your hand at this you don't get on too well, don't despair. The tools and glues you've probably bought will come in handy for that foamy you're just about to buy...
The plan then. This is by Peter Rake, who Mike Roach says does
a good plan, but there are some gaps in the write up that I hope
to cover as you read this. Like the plan says, make sure at each
stage that everything is square before the glue dries. Apart from
epoxy for the undercart, all glues are cyano, medium and fast.
Almost everything about the Rapid is simple as far as parts are
concerned. Make up your kit of parts and rib pack. Start by...
Now there's a question. I've never asked, and no-one's ever told
me whether to start with wings or fuselage. The easy answer is
whatever takes your fancy. One day it'll be the wings, or, today
it's the fuselage. I tend to build the slightly more complicated
looking part, then when I run into a problem that I can't see
my way round, I go and build the tail parts or the wing. While
I'm doing that the solution usually presents itself. This is one
reason for preparing a kit of parts. The other reason is, so you
don't find a material shortage three quarters of the way through
the build and can't get to the shop to replenish your stock for
three days. When you're building the fuz, the instructions tell
you to add the 1/8"sq to support the top, bottom, and the
front and rear formers. Use your slower / medium cyano for this,
(you'll be amazed at how fast thin cyano can wick through a piece
of balsa). The supports for the motor plate need to be fairly
tight and not too soft a piece of balsa. Don't forget the weight
of the motor, gearbox and spinning prop are on these rails, so
any vibration or shock during a less than perfect landing will
soon magnify any play, and excessive softness will be like not
having anything there at all.
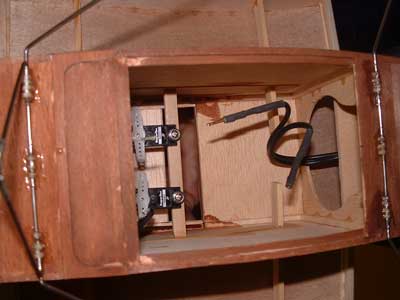
F1 - your front former that your motor plate slides through,- you're told not to split it before fixing. Leave about an 1/8" of wood to be removed later. I made a hatch on the underside of the fuz between the undercart mounts, with a few bits of 1/64" ply for effect and to hold the curve in the hatch once it had dried from the gentle dampening to help with forming to the fuselage curve. Before you sheet the underside it is worth considering fitting your servo rails, while you can get inside. You can fit after, but it's easier now.
When making the cheeks to go on the sides behind the cowl you need to consider the position of the wing root leading edge. If you are not careful in your shaping it will mean dremelling later on because the back of the cheek is preventing the wing from sitting tight to the fuz. Before glueing the top decking in place you will want to place some brass tube for the upper rigging wire support - you did do the wire work for this while you were preparing the "kit", didn't you...
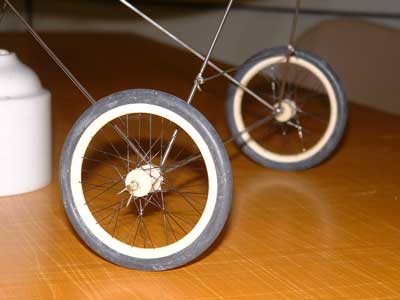 When you've managed to attach your
undercart to your painted (acrylic works well, slightly thinned),
fuz and are happy with your needlecraft, apply the epoxy inside
and out sparingly. This time of year, especially if you are working
outside in a cold shed, your epoxy is going to be very thick.
Take it inside and warm it in a small pot of hot tap water, then
out again and mix and use quickly. By the way, heat will probably
speed up the curing a tad, so don't mix too much at one time.
Warming the resin also allows it to soak into and around the stitching
better. Buy a good heavy cotton, as there are other uses for this
later on, and you won't lose your wheels because the thin cotton
has broken inside the glue and you haven't noticed.
When you've managed to attach your
undercart to your painted (acrylic works well, slightly thinned),
fuz and are happy with your needlecraft, apply the epoxy inside
and out sparingly. This time of year, especially if you are working
outside in a cold shed, your epoxy is going to be very thick.
Take it inside and warm it in a small pot of hot tap water, then
out again and mix and use quickly. By the way, heat will probably
speed up the curing a tad, so don't mix too much at one time.
Warming the resin also allows it to soak into and around the stitching
better. Buy a good heavy cotton, as there are other uses for this
later on, and you won't lose your wheels because the thin cotton
has broken inside the glue and you haven't noticed.
The wings are easy enough. Lay all your parts out over the protected plan, check for fit and alignment and glue, except R1. If you leave R1 until a bit later then you can fit the wings to the fuz at the correct dihedral and tack them in place, being careful not to glue the wing to the fuz yet. If you're worried about accidents then stretch and tape some cling film in position over the spar holes so you don't need to worry. The rigging blocks are just glued in position as per plan, and sanded to match the rib. Make sure they are secure, as the security of your wings, rigging and flying depend on this, not that I want to put any pressure on you. I haven't decided on my rigging method yet as I'm holding off completion so I can enter this for the Construction & Finish Competition. The rear stick construction seems weak. Don't forget that the covering will add strength to the finished model and extra beefing up is unnecessary as this is not a pattern ship or pylon racer, and it will only add weight which, as an electric flyer, you'll be told is what you don't want. Basically build the rear as plan. Add some 1/8" at the back to support the tailplane. Ensure your fin support plate is square. You could pin your fin to it so you have a visual aid to help with alignment. Later on, with wings on, you can glue the rudder on so it will be square to the fuselage, i.e. straight along the centre line of the fuz. This 'build it accurately' approach pays off as much now as it will later when you likely buy your first mouldy (moulded by any other name) fibreglass model which, although A.R.T.F., may involve a bit of construction, including attaching the tail which may not be plug and play.
 So, in an issue or two you'll get
the rest of this after it's been scrutinised for C&F. Until
then I can't tinker with it (the model), but that isn't stopping
me from other projects. For instance;- a 60" straight leading
edge wing for the Compact still with the same taper. A 44-48"
tapered aileron wing for the Flying Fox, which flies well enough
with its polyhedral one now, but... . Also I need to finish the
50" fan trainer with fibre glass fuz which is giving me more
time to gain experience before I start the moulded fuselage mould
thing, that I've been promising myself and certain people are
keen to see happen. I've also got the notion to do a part glassed
prototype, Supermarine Spiteful for a geared 6/700 or brushless
(I wish), with the option of taking it sloping. One thing at a
time. I really dislike covering although it's an important part
of scratch building, I suppose there are those of us that dislike
the build, but enjoy the finishing and detailing.
So, in an issue or two you'll get
the rest of this after it's been scrutinised for C&F. Until
then I can't tinker with it (the model), but that isn't stopping
me from other projects. For instance;- a 60" straight leading
edge wing for the Compact still with the same taper. A 44-48"
tapered aileron wing for the Flying Fox, which flies well enough
with its polyhedral one now, but... . Also I need to finish the
50" fan trainer with fibre glass fuz which is giving me more
time to gain experience before I start the moulded fuselage mould
thing, that I've been promising myself and certain people are
keen to see happen. I've also got the notion to do a part glassed
prototype, Supermarine Spiteful for a geared 6/700 or brushless
(I wish), with the option of taking it sloping. One thing at a
time. I really dislike covering although it's an important part
of scratch building, I suppose there are those of us that dislike
the build, but enjoy the finishing and detailing.
Question:- Is there a rule that governs the difference between static and flying current, especially in relation to E.D.F? I don't think there is, but could someone put me straight on this?