In the last issue, we reached the point where the SE5 had flown in virginal white form. Having successfully negotiated the maiden flight, the question arose as to how to finish it....
Finishing (well, nearly!)
All my models are film covered, for good reason. The reason
being that I don't get on with paint. Eventually though I had
to face the harsh, but inescapable, fact that film covering Depron
was not an option. In order to make a virtue out of necessity,
I decided that I would use the SE5 as my first venture into the
terrifying and mysterious world of airbrushing. After all, apart
from pride, there was only £2 worth of Depron at stake.
Asking around about others' experience with airbrushing brought a bewildering range of answers, perhaps the only common factor being that airbrushes are a devil to keep clean. As for air supply, most people seemed to think a mains powered (ex-fridge) compressor was necessary, although others referred to compressed air canisters or even something which sounded like a variation on a blowpipe. My ears pricked up when Dave reported that he used a 12v car tyre inflator connected directly to a cheap Badger mini spray gun. He very kindly offered me the loan of this set up and so the experiment began.
I will spare you the long version, and leap straight to my conclusions from what was a rather steep learning experience:
Acrylic paints are fine on Depron. However I just couldn't get on with the artists acrylics sold in tubes, even though the ones which I bought are clearly marked as suitable for use with an airbrush. No matter how I thinned them, I couldn't find the happy medium between a runny mess and a splattering of freckles. Tamiya acrylics, by contrast, are terrific. These come in jars, at about a £1 per jar, and although I have subsequently read that these should be thinned, I got on pretty well using them straight from the pot. As a bonus, the Tamiya jars screw straight onto the Badger spray gun, so colours can be swapped in an instant and there is no jar to clean afterwards.
The Badger 150 mini spray gun works well for this kind of area coverage job. If you want to spray fine detail though, you would probably be better off with an artist's airbrush. Because the Badger is an external mixing gun, there is only one nozzle to get blocked and this can be cleared easily with a pin. This may be why I was able to get away without thinning the paint.
The 12v tyre inflator provides lots of pressure (typically up to 150 or 200psi). However, the limiting factor is the volume of air it can deliver. With Dave's combination, the volume match is pretty good. When the air button is pressed there is a sudden high pressure burst, then the pressure drops to around 20 - 30psi, which is within the recommended range for the spray gun. I have bought myself a similar set up and intend to look into some way of reducing the initial high pressure burst, perhaps by using an air reservoir and maybe a pressure relief valve.
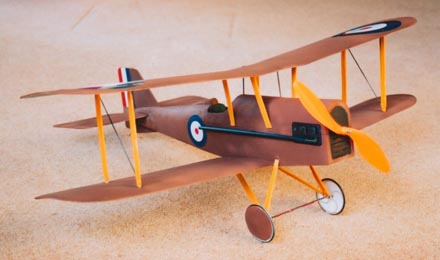
After the stress of spraying the basic airframe, I then enjoyed myself dressing the SE5 up a bit. This included adding Depron undercarriage and wing struts, dummy engine cylinders (more Depron) and exhausts (drinking straws). I cut out and painted a paper dashboard and had a go at carving a pilot out of blue foam. Unfortunately the latter looked more like Red Riding Hood's grandma - after the wolf had called - so the cockpit remained unoccupied for a while longer.
I had difficulty locating some suitable roundels and eventually had to settle for some Flair WW2 vinyl stickers. Not truly authentic, printed on a relatively heavy vinyl and, at a cost of £5, they more than doubled the cost of the model, but never mind.
 Finals
In spite of the multiple painting attempts, the whole finishing
exercise added a total of one ounce, bringing the flying weight
with 6 cells on board to 7oz. Before the first 'painted flight'
I suddenly realised that most of this extra ounce had probably
been added behind the cg, so I shifted the battery forward a bit.
The result was that the model flew just as it had on its first
outing.
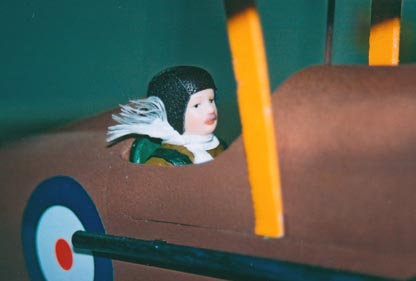
A few weeks after this first 'liveried' outing, I received a surprise birthday present. Daughter Ruth, who is into building 1/12th scale doll's houses, presented me with a stuffed figure with porcelain head and limbs. It seemed a bit of a shame to butcher the poor chap, but he was ceremoniously beheaded and the head transplanted into a piece of blue foam - and now it was time to get out those Acrylic artists paints. Used with a brush, these really came into their own, and in no time I had a presentable pilot. Mary made him a silk scarf and we even managed to top him off with a genuine leather flying helmet made from pieces of an old wallet.
The model has now had several outings in this fully finished
form. The early tendency to crab has now been controlled by a
bit of judicious wing warping and the model is a pleasure to
fly. It will fly comfortably in the Oakmead hall, but really comes
into its own in the larger halls. On 6 cells it is comfortably
powered for cruising around and will turn in 7 minute flights
on the cheap Perkins batteries (nominally 250mah, but actually
nearer 160mah). If I get bored and want to try gentle aerobatics,
I will upgrade to 7 cells, but I think I will enjoy watching it
fly for a while before trying to break it!