Sloping Off - June 2005
The One Ounce Airframe
by Mike Roach
The Sopwith SS3 featured in the January 2005 issue of Flying Scale Models has given me a great deal of pleasure, performing equally well indoors or out. Its flying weight of just 3 oz and a light wing loading (2 oz/sq ft) made slow flying very easy and at 24” span it could be left in the back of the car for those occasional calm sunny days. But I still hankered after a model that was unequivocally for indoor flying; slower and lighter but still recognisably a scale model. But with the Falcon PU01 and RC gear weighing about an ounce, an airframe weight of one oz would give a wing loading of about 1.25 oz/sq ft and MUCH slower flight.
But please note: an airframe this light will not give you a sturdy model like the SS3. It needs careful handling and must be fully rigged to in order to fly. If you have never built this light before, you will discover whole new areas of clumsiness you didn’t know you had, but it can be made in a couple of days and repairs take just a few minutes. And, the whole point of the exercise, it can fly VERY SLOWLY.
THINGS TO BEAR IN MIND
The whole point of building this model is to make an airframe that weighs an ounce, covered and ready for the RC gear. This takes some discipline on the builder’s part, not to add unnecessary weight by reinforcement, scale detail or heavy materials.
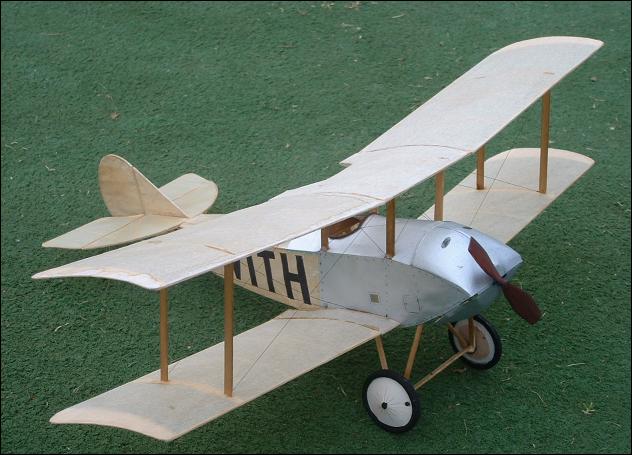
My Schneider Racer was made with wood and paper and tissue, all out of my spares box. The wheels were made from Depron and the axle from very thin wire. Strength is added to the structure by thread bracing and the thinnest ply parts where necessary. 30 grams is your top limit, but by using Esaki Lite tissue and selecting the balsa more carefully, an even lighter model could be built. I re-learned an important lesson during the building, that no matter how flimsy the structure may seem when you pick it up off the board, the covering adds tremendously to the overall strength, so “build light and fly right”!
COVERING
The main compromise over scale fidelity lies in only covering the upper surfaces of the wings and tailplane. This is very obvious on the ground but not apparent when flying and saves a lot of time and effort and some weight! If you can pre-shrink the tissue (make a frame, tape the tissue over it and water-shrink) you will get a better finish than I did. The real thing was immaculately prepared and to judge from the photographs, had no wrinkles or sagging at all.
My method of attaching the tissue is to use white glue. It has no smell, so does not offend the more sensitive members of my home, and I have found it to be much faster and more effective than using dope. Accurately cut the tissue slightly oversize, by only a few mm. Thin some glue with 50% water and paint this round the outline of the structure and over the full-depth wing ribs. Then just lay the tissue over the top and gently smooth it into the glue. When that is dry (only a minute or two) flow a little more glue mixture over the edges and wrap the excess over just like covering with films. You must not water-shrink the covering on the wings, or they will warp and bend uncontrollably!
 FLYING HOW DO THEY COMPARE?
After a short hop round the local cricket pitch to prove that it was roughly in trim, I took this model and the SS3 to the Waltham Chase Aeromodellers’ indoor meeting at Fleming Park. This is a large 10-court hall near Eastleigh and Waltham Chase has a very friendly group of fliers who will keep clear if you say you are having a test flight. I had recently bought a Futaba 6 EXA transmitter (excellent value and superb service from Al’s Hobbies: they were very good at answering my foolish questions) and the luxury of programmable trims for each model was well worth the £49 it cost. The SS3 flew first, at 3oz all-up weight. I had recently tightened up the thread control linkages and the more accurate centreing made flying indoors much easier than before. The model takes off perfectly with just a touch of “up” and cruises round the hall at running speed on full throttle, but can be slowed down to a brisk walk.
The Schneider Racer was next and after a little trimming out, direct comparison was easily made. The lighter model is much more responsive and I was soon doing chandelles and very tight turns in one corner of the hall. The little PU01 motor has (relatively speaking) lots of power and while it was possible to fly the Racer as fast as the SS3, slow flight was very slow indeed, down to walking pace and looking very realistic.
THE WAY TO GO
These little models are, in my opinion, the best way to enjoy scale indoor flying. They are not too difficult to make, even at a mere 28 grams for the model itself. Falcon gear is slightly awkward for anyone like me with larger thumbs than normal, but their “breeze block” does simplify installation. Rigging is actually easier on the “reduced-cal” model than the scale one and flying is just a joy! They will keep up with faster models if you want them to, but they are at their best in slow, graceful and realistic flight. Scale manoeuvres are possible and even on the first flight of the Schneider Racer I felt confident enough to try a wingover or two. Most importantly, they make the average 4-court sports hall feel much bigger as they cruise slowly round.
I waited until there was a completely still evening before flying out of doors and had a very enjoyable time at the local cricket pitch exploring the handling. Despite balancing at 30% mean chord I had to take some down thrust off and add some side thrust on to get a nicely balanced flight pattern, ending up with perhaps one degree down and 3 or 4 degrees right as shown on the plan. Then it flew hands off in the evening sunshine, touch and goes were easy, slow flight was down to 2 or 3 mph in the very slight air movement. Of course on the way home I gave in to my irresponsible 15-year-old alter ego and taxied it gently along the tarmac, took off and flew it backwards and forwards along the street until the battery started saying it was time for a charge. Perfect: why build larger models when you can have this much fun out of the spares box?
NOTES ON THE FALCON EQUIPMENT
As supplied from Falcon, the Breeze Block is set up for Mode 2 with rudder and elevator on the RH stick and throttle on the left, and it is not like an ordinary RX where you can change a servo’s function by plugging it into a different socket. The servos on the Block are fixed. I fly Mode 1, with the throttle on the right, so had to send it back to Falcon for adjustment. They say this can be done by any competent solderer, but I excuse myself from that class of modeller! I have to change my new Futaba TX to back to Mode 2 (a simple adjustment how did I ever manage with my old Tranny?) to make the servos and SC operate correctly for me, but that’s a small price to pay for a 5.25 gram-120 metre range delight. It’s small enough to be powered by just one LiPoly cell (in a rubber-powered model, for example). With 2 or 3 cells the SC plugs into the PC board and an extra servo can be fitted using a fly lead.