
Want to fly indoors next month? Never flown indoors before?? Never flown RC before???
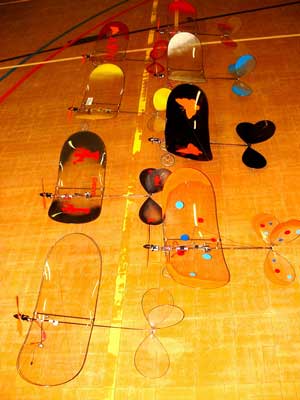
This is the model to buy! Everywhere you fly indoors these little lightweights can be seen. They are this year's "Indoor Stick" taking the concept a step further, with a far better performance due to their light weight and excellent aerodynamics. They're not exactly new though. Look in the November 1968 copy of AMI, page 60, and you'll see a couple of Dr Stephan Dolch's Braun Model Technik "Stuben Fliege" - a Butterfly with a V tail, but otherwise identical, even to the use of "highly expensive, highly dangerous" Li-Ion cells. The good Doctor has simplified the concept, but the principle is identical.
Let's cut to the chase then: the flying qualities are wonderful,
the kitting and instructions are disappointing, but an experienced
builder will have no trouble in getting the Butterfly into the
air in about an hour. However, a beginner (and I think it makes
an excellent beginner's model) would have a lot of difficulty
with some aspects of the assembly.
To get some background, I asked Google to look for "rc butterfly".
The first hit was very much more interesting than I imagined
and gives all the details you could want and more, including video
footage and action shots. The trouble is, Jim, it's remote control
butterflies, but not as we know them! I'll say no more, but if
you have the parental controls activated, you will not be very
much the wiser!
The instructions have pictures to guide you through the very few steps to a flying model. The English is purely functional and could have done with some proof-reading to eliminate the silly mistakes, omissions and downright poor advice. The photos were clear and well thought-out.
The very first step was to slip the battery holders onto the fuselage. Mine were drilled for a 2mm rod - the fuselage is a 5mm rod. I enlarged the soft plastic fittings using successively larger drills, but still managed to get one of them a little off-centre. Not terribly important, but to a beginner such a dent to his confidence. You are not actually told to plug in the undercarriage and glue it in place, but this comes next. The undercarriage is fine in principle, but has such small wheels that I couldn't see the prop clearing the ground on takeoff, nor was it easy to get the wheels running freely or even aligned with the direction of travel. I gave up and borrowed the wheel assembly from my old Pico Stick and bound it to the fuselage behind the motor mount with thread, then seized the binding solid with cyano. If I do need the UC back, simply cutting the thread will allow it to be taken off with no damage to either component.
I was then asked to mount the motor onto the fuselage, which is circular in cross section while the mounting for the GWS motor is rectangular. Small strips of triangular section balsa are supplied to complete this fixing, but they are oversize and I suppose must be forced into the gap and glued in. Not very elegant! Instead, I cleared an interference fit from a strip of 5 x 8 hard balsa and cyano'd this to the end of the rod, making the motor removable if it was not up to the job (there had been some mutterings amongst club Butterfliers about its quality and John of Channel 4 Models told me that they were now being advertised "with free motor"). My second gripe is that the motor comes without the standard GWS connector lead, so if you follow the instructions you have to do some very delicate soldering to attach the speed controller, with the motor glued to the model!
The fin and tailplane went on easily, despite the translator getting his elevator mixed up with his rudder in the English and Dutch, but not in the German and French. They are already assembled with liteply horns, but you have to take care to get the elevator horn on the underside on the model, or it will foul on the rudder. I was asked to assemble the wing to the fuselage at this point, but since there was a bit of quite fiddly work still to be done I declined. Anyway, the wing can be clipped on securely without glue, at least for test flights.
A quick systems test showed that my 30 year old Fleet Mk 3 tranny still worked, but I had to swap the functions round on the Rx from those which my recently defunct Futaba set preferred (OK, it was 20 years old.). A balance check was spot on, 90mm behind the leading edge and the weight ready to fly was just four grams heavier than the 160 specified, probably because I used a heavier Rx than necessary and had replaced the carbon fibre UC provided, with the Pico Stick one. I made one more modification, drilling a 1 mm hole in the rear fuselage and fitting a carbon fibre rod tailskid, to get the elevator horn clear of the ground. Following the example of other club members, I dusted the wing and tail tips with some spray paint to make them more visible and set up my venerable tranny to give 35mm each way on the elevator and about 60mm each way on the rudder.
I couldn't resist taking it out into the garden and surprising the dog with a neat takeoff and a circuit round the apple tree, then had another little fly in the road outside the house, just to see if all was really well with the performance. A few days later, on a calm Autumn afternoon, she flitted round the cricket pitch for 20 minutes, doing consecutive inside and outside loops, very slow flypasts, high speed dives, full up and full rudder circles until I was convinced this was the best-flying model I had owned. It was amazing how little throttle she needed to maintain height, and the glide with motor off was impressive for such a draggy little plane. At our Club indoor meeting at Oakmead the following evening seven more turned up and apart from a mid-air with my Howard-Wright (fixed in a couple of hours) I had a ball. Now if only my flying was as good as Phil's..
 Likes.
It has superb performance and amazingly responsive controls, while
at the same time being very forgiving and manageable. It would
indeed make an ideal trainer, preferably with a mate with a buddy-box
beside you. If you are determined to go it alone and can fly a
glider, then wait for a really calm day (7am in Summer is best!)
and take it to your local field and have a go - it's great! If
you want more performance (vertical takeoff, anyone?), try the
GWS twin 150 as a direct replacement for the kit motor.
Dislikes.
The instructions are not well written and the assembly sequence
is poor. The final drawing showing the assembled model and the
c of g location puts the battery ahead of the front wing post,
the reverse of the written instructions - and is incorrect.
Some important features are missing. A tailskid is necessary unless you want the elevator control horn to drag on the floor every time you take off and land. The motor mounting method is agricultural, in contrast to the excellently engineered wing and tail group. There is a potentially serious weakness in the fuz at the wing/UC attachment point, where six holes are drilled into the rod in the space of a centimetre or so. The motor supplied with the kit is not powerful enough to fly it properly and does not have any leads attached: soldering the speed controller to the motor is a very delicate task and not something that every beginner could complete successfully.
Conclusions. None of the criticisms will significantly affect the fun an experienced modeller will have with this wonderful little plane, but for a beginner it might well be back to the model shop in double-quick time for a bit of help with two or three points.
There is an extraordinarily good indoor model in there, slightly let down by poor kitting and muddled thinking, but the concept is fine and it will provide hours of fun for both experts and beginners alike. I thoroughly enjoyed flying it in company with all the other Butterflies in the Club.