|
Christchurch and District Model Flying Club |
|
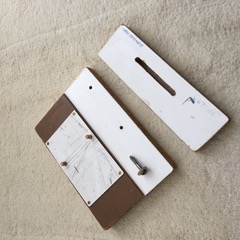
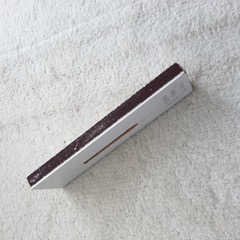
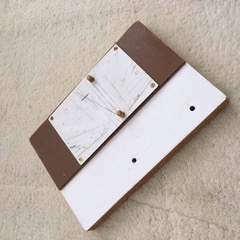
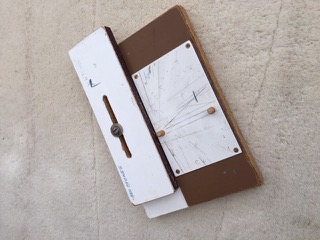
KEN SPOKES’ SANDING GIZMO Ken always comes up with great ideas, beautifully executed. here’s one: Here is a little gadget that is simple to make. It is something I made many years ago and have found invaluable when making small sanding jobs more precise It comprises two parts A base and a slider. The whole thing can be any size you care to make it. For reference, my base measures approximately 8” by 4” and the slider 8” by 2”. Both parts are made out of 5/8 formica faced chipboard but as I said, anything similar would do. First the base. That has a piece of 1/8 Paxsoline (do they still make this stuff?) glued on it as far as the slider That is the brown bit in the photo. This could be anything hard wearing. Make sure that the edge facing the slider is perfectly straight.. On top of this I put a piece of white formica for marking our sanding angles. Two pegs were inserted, one near the slider edge to act as a steady and the other at the far edge, ninety degrees to the first as a useful reference The slider has a slot cut as shown in the photo to hold it in place with a screw and washer as it slides backwards and forwards when sanding. This should be a very slack fit. Next, glue on a strip of medium high grade grit ( the brown stuff ) to the edge so that the bottom just skims the top of the slider stop. Make sure that this is ninety degrees to the base. And that is about it In use, I usually cut the piece to be sanded roughly to size and then finish with the sander. Joints are usually more precise and much stronger finished this way. Happy sanding
|
|
[Home] [Chairman's Chatter] [Each Way] [Ivan P] [New seaplane] [Andreas] [Luciole] [Lipo voltage] [Tim's Clevis] [Clive's stripper] [Ken's Sander] [Richard's strip] [Yeoviton] [Models] [Norge] [QSBO] [Calculator] [Mike E] [Tailpiece] |


